
Advanced Usecase with Docker: Connecting Containers

Docker is a great tool, and seems simple to use when we just begin with an application, packaged inside a container. However, in real usecase, there will be so many complex situations, where a solution need multiple contains linking together, especially with multi-tiers application. Today we will go deeply about how Docker containers can connect to others while running, and how can we setup interactive, dynamcally linkage between containers for development and migration.
We have at least 3 ways for connecting containers:
- Using network port mapping - Directly port forwarding
- Dynamic DNS
- Using pipe networking
- Using container linking
- Using ambassador container
Using Network Port Mapping
Directly port forwarding
This should be the most simple way to enable communication between Docker containers. Let’s say we have two container:
- Container A: running NodeJS, expose port 1200 to its host, host machine IP Address
142.232.11.10
$ docker run -d -p 1200:80 codentrick/nodejs node app.js
Container B: running Apache, expose port 80 to its host, host machine IP Address 142.232.11.11
$ docker run -d -p 80:80 diepnh/webapp
Then because both containers expose their service port through their hosts, you will know that 142.232.11.10:1200 is listening for any NodeJS requests, and 142.232.11.11:80 is listening for any HTTP requests, so a web application inside Container B, can make ajax request to NodeJS running inside container A through its IP Address.
The advantages are simplicification process and we just pass port parameters to run command, but disadvantages are application will be bound to a specific port, and this is not dynamic since application must expose through a TCP/IP.
Dynamic DNS
The general idea is that you specify a single name for your database (or any other service) and update a short-lived DNS server with the actual IP as you start and stop containers. Then the container should always point to a domain, and the DNS server will redirect that domain to container actual IP Address which it had when it started.
A good example is SkyDock. It works with two docker containers, the DNS server and a monitor that keeps it updated automatically.
Pipe Networking
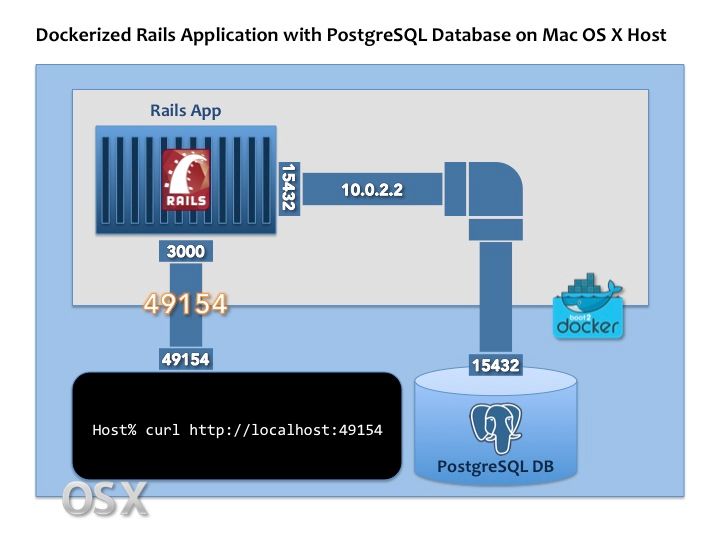
Docker creates a special Linux bridge called docker0 on startup. All containers are automatically connected to this bridge and the IP subnet for all containers is randomly set by Docker. Currently, it is not possible to directly influence the particular IP address of a Docker container. Luckily, there is a shell script pipework which you can use to add another interface to a container with a specified IP address.
For example:
$ sudo ./pipework docker0 -i eth1 $(docker ps -q -l) 10.2.0.11/16
adds the interface eth1 with IP address 10.2.0.11 to the last started container.
Using Container Linking
[![Docker_Linking_Dual]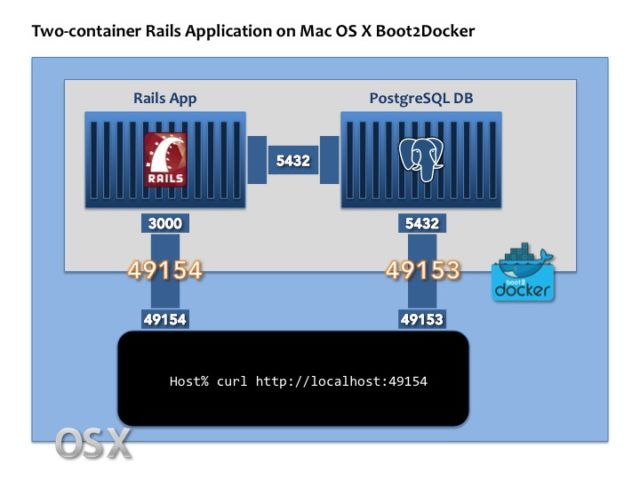 om/content/images/2015/07/Docker_Linking_Dual.jpg)
Docker supports native linking between containers by refering to their names. We can get random name while running a container, or we can manually set a name for the container. Docker links automatically propagate exposed ports of one container as shell variables to another container. In this way, the second container can dynamically adjust network settings upon startup without the need to modify an image nor configurations.
We start a container with a name like:
$ docker run -d -name mongodb diepnh/mongodb
Later, we start another container and allow linking like this:
$ docker run -d -name webapp -link mongodb:mongo diepnh/webapp
This link connects the web server to the MongoDB and automatically creates environment variables in the web server container passing IP address and exposed port from the MongoDB to the web server container. The environment variables are prefix with the alias name capitalized and the exposed port number like:
HOME=/
PATH=/usr/local/sbin:/usr/local/bin:/usr/sbin:/usr/bin:/sbin:/bin
HOSTNAME=04a4ee4470e1
TERM=xterm
MONGO_PORT=tcp://172.17.0.2:27017
MONGO_PORT_27017_TCP=tcp://172.17.0.2:27017
MONGO_PORT_27017_TCP_ADDR=172.17.0.2
MONGO_PORT_27017_TCP_PORT=27017
MONGO_PORT_27017_TCP_PROTO=tcp
All variables are accessible from within linking container. So our webapp has all those available params. We will have a Dockerfile just like:
CMD /usr/sbin/apache2 -D
FOREGROUND 8080
$MONGO_PORT_27017_TCP_ADDR
$MONGO_PORT_27017_TCP_PORT
and then, the container will automatically pass the correct network information.
Using Ambassador Container
Rather than hardcoding network links between a service consumer and provider, Docker encourages service portability, for example instead of:
(consumer) --> (redis)
Requiring you to restart the consumer to attach it to a different redisservice, you can add ambassadors:
(consumer) --> (redis-ambassador) --> (redis)
Or
(consumer) --> (redis-ambassador) ---network---> (redis-ambassador) --> (redis)
We will discuss about ambassador in next post, and will try to deploy a web app with web-service layer using all three ways above.