
Animated Splash Screen for iOS App


We are preparing for a brand new app, for both Android & iOS about music. While our designer is busy with Sketch and Photoshop, we want to test some experiments for make our app more interesting, and we come to an idea, just like this:
[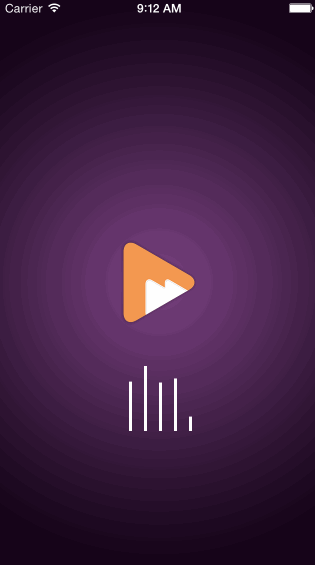
This a splash screen for the app, which has a gradient background and a logo. Because our app is about music, we want to add some fancy animation here, 5 lines will dance just like an equalizer and I think it is quite suitable.
Today we want to help you to create a similar animation for your own splash screen.
Create Project
Fire up XCode and create a new project:
[ om/content/images/2015/07/AnimatedCreateProject.png)
Setup View
Open storyboard and drag an image which will be your background of splash screen:
[om/content/images/2015/07/AnimatedAddImage.png)
Change mode to Aspect Fill and tick Clip Subviews to ensure our background is displayed without cropped or streched.
Animated View
Drag a view onto our storyboard with specified size, like 100×65, we will have animation inside this view:
[om/content/images/2015/07/AnimatedView.png)
Drag an Outlet for this view to our Controller:
[om/content/images/2015/07/AnimatedOutlet.png) Custom Animated View
Custom Animated View
Create a custom view for our animation:
[om/content/images/2015/07/AnimatedNewView.png)
Next is important part, we will use the view inside storyboard as a container for our animation, and all animations as well as drawing is happened inside this container by using CALayer to avoid create too much views.
First, declare some variables:
var containerView: UIView! // this is our view inside storyboard
let containerLayer = CALayer() // this is a container for all other layers
var childLayers = [CALayer]() // we will store animated layers inside an array
let lowBezierPath = UIBezierPath() // to create animation, we use a path as original shape
let middleBezierPath = UIBezierPath() // our lines will animate low, or high to create random effect
let highBezierPath = UIBezierPath() // and this is high position of animation
var animations = [CABasicAnimation]() // finally, an array to store animation objects
Override initializer, and add our custom init function:
init(containerView: UIView) { //custom initializer
  self.containerView = containerView // reference to container view
  super.init(frame: containerView.frame) // then call super initializer
  self.initCommon() // a function for common init
  self.initContainerLayer() // init the container layer
  self.initBezierPath() // init all paths self.initBars() // init child layers which will draw lines
  self.initAnimation() // init animation objects
}

required init(coder aDecoder: NSCoder) {
  // Swift requirement super.init(coder: aDecoder)
}
And create corresponding init functions:
First, init frame for this view:
func initCommon() {
  self.frame = CGRectMake(0, 0, containerView!.frame.size.width, containerView!.frame.size.height)
}
Then create container layer. Note that the layer’s size, anchor point and position are up to you to specified animation position and size:
func initContainerLayer() {
  containerLayer.frame = CGRectMake(0, 0, 60, 65)
  containerLayer.anchorPoint = CGPointMake(0.5, 0.5)
  containerLayer.position = CGPointMake(self.frame.size.width / 2, self.frame.size.height / 2)
  self.layer.addSublayer(containerLayer)
}
Next, we init our paths, the lowBezierPath will be a rectangle with size of 10×3, and because our path is calculated from top to bottom, while our lines are animating from bottom to top, so we will have frame of path like follow:
func initBezierPath() {
  lowBezierPath.moveToPoint(CGPointMake(0, 55));
  lowBezierPath.addLineToPoint(CGPointMake(0, 65));
  lowBezierPath.addLineToPoint(CGPointMake(3, 65));
  lowBezierPath.addLineToPoint(CGPointMake(3, 55));
  lowBezierPath.addLineToPoint(CGPointMake(0, 55));
  lowBezierPath.closePath();
Our middleBezierPath will be a medium rectangle with size of 50×3 and highBezierPath will be largest rectangle of size 65×3:
  middleBezierPath.moveToPoint(CGPointMake(0, 15));
  middleBezierPath.addLineToPoint(CGPointMake(0, 65));
  middleBezierPath.addLineToPoint(CGPointMake(3, 65));
  middleBezierPath.addLineToPoint(CGPointMake(3, 15));
  middleBezierPath.addLineToPoint(CGPointMake(0, 15));
  middleBezierPath.closePath();
  highBezierPath.moveToPoint(CGPointMake(0, 0));
  highBezierPath.addLineToPoint(CGPointMake(0, 65));
  highBezierPath.addLineToPoint(CGPointMake(3, 65));
  highBezierPath.addLineToPoint(CGPointMake(3, 0));
  highBezierPath.addLineToPoint(CGPointMake(0, 0));
  highBezierPath.closePath();
}
Next, we init 5 lines, or called bars, which origin paths are lowerBezierPath:
func initBars() {
  for index in 0...4 {
    let bar = CAShapeLayer()
    bar.frame = CGRectMake(CGFloat(15 * index), 0, 3, 65)
    bar.path = lowBezierPath.CGPath
    bar.fillColor = UIColor.whiteColor().CGColor
    containerLayer.addSublayer(bar)
    childLayers.append(bar)
  }
}
Finally, init animation objects, which will animate from lowerBezierPath to another path:
func initAnimation() {
  for index in 0...4 {
    let animation = CABasicAnimation(keyPath: "path")
    animation.fromValue = lowBezierPath.CGPath
    if (index % 2 == 0) {
       animation.toValue = middleBezierPath.CGPath
    } else {
       animation.toValue = highBezierPath.CGPath
    }
    animation.autoreverses = true
    animation.duration = 0.5 animation.repeatCount = MAXFLOAT
    animation.timingFunction = CAMediaTimingFunction(controlPoints: 0.77, 0, 0.175, 1)
    animations.append(animation)
  }
}
Note that the timingFunction parameters are up to you to create timing effect.
Animate
We create a function for showing animation. We loop through all animation objects, and create a delay of 0.1 second then add animation to our bars:
func animate() {
  for index in 0...4 {
    let delay = 0.1 * Double(index)
    var dispatchTime: dispatch_time_t = dispatch_time(DISPATCH_TIME_NOW, Int64(delay * Double(NSEC_PER_SEC)))
    dispatch_after(dispatchTime, dispatch_get_main_queue(), {
      self.addAnimation(index)
    })
  }
}
The addAnimation function:
func addAnimation(index: Int) {
  let animationKey = "\(index)Animation"
  childLayers[index].addAnimation(animations[index], forKey: animationKey)
}
Now we are done for this class. Back to our view controller and construct the animation view. Do not forget to clear our container background, as well as add our animation view to animation container as a subview:
override func viewDidLoad() {
  super.viewDidLoad()
  let view = AnimatedEqualizerView(containerView: animationContainer)
  self.animationContainer.backgroundColor = UIColor.clearColor()
  self.animationContainer.addSubview(view)
  view.animate()
}
And that’s it! You can run project and watch your animated splash screen!
Source code for this project can be found at GitHub.