
Parallax Effect for iOS with Swift (Part 2)


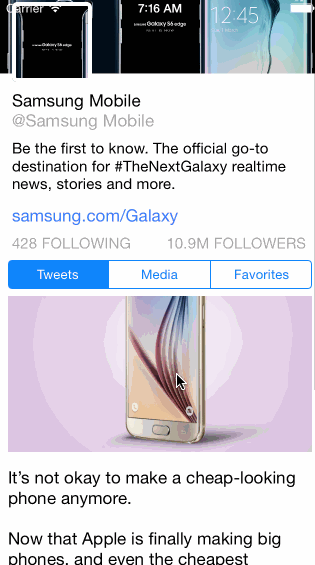
In previous post, we had used only storyboard to achieve parallax effect for cover photo just like Twitter app. In this post, we are going to implement the similar effect, but for an image inside scrollview, so when we scroll, the image is scrolled but with parallax effect inside, just like this:
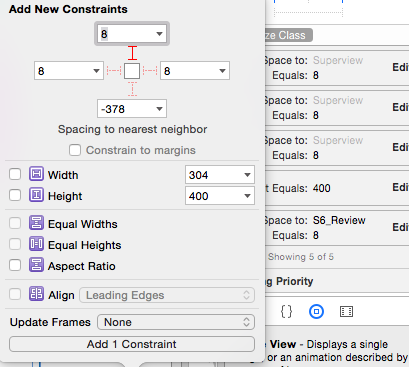
Now use project from last post, we are going to add another ImageView into ScrollView content. Here we have constraints of width, height, and spacing to left, right of ScrollView, and spacing to nearest top element:[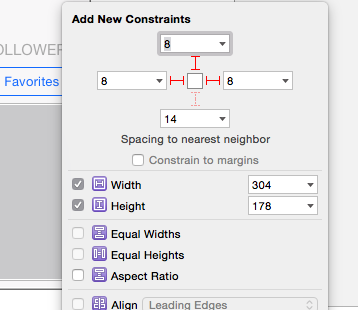 Connect it as an Outlet for scroll handling:
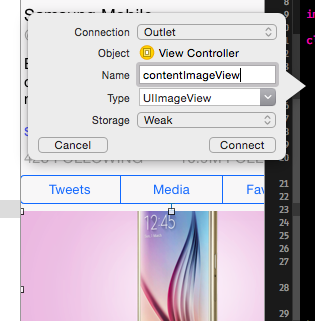
[
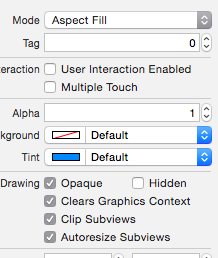
Set scale mode to Aspect Fill and check Clip Subviews, this will make our ImageView properly displayed without exceed its frame:
[
Note that our label is now overlap with the image, we will adjust that by remove old top constraint of the label, and add another constraint to properly make its top position below ImageView:
[
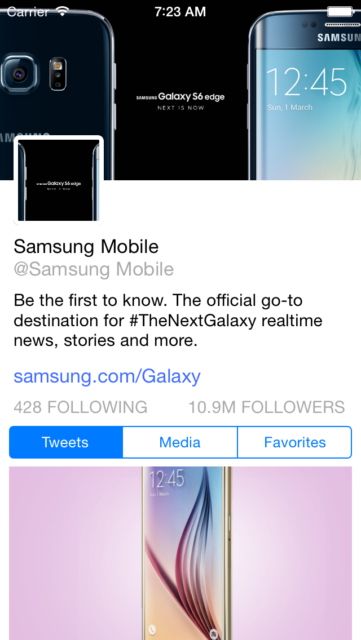
Now you can run and see your ImageView is properly placed:
[ om/content/images/2015/07/Parallax_ImageViewPlaced.png)
Scroll Handling
Next, we need to handle scroll view’s scrolling event to make our image has properly offset. To do that, first, we create another outlet for our UIScrollView:
[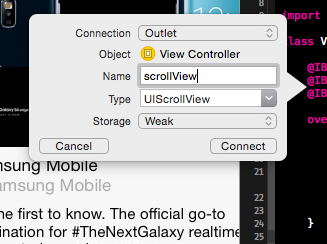 Then in our viewDidLoad() function, we set our view controller is delegate for scroll view, and make our image view clipToBounds:
override func viewDidLoad() {
  super.viewDidLoad()
  ......
  scrollView.delegate = self
  contentImageView.clipsToBounds = true
}
We need to make our scrollView conform to UIScrollViewDelegate protocol, so we can listen to scrolling event:
class ViewController: UIViewController, UIScrollViewDelegate {
and override:
func scrollViewDidScroll(scrollView: UIScrollView) { }
Now, when scrollview is scrolling, thing will change is contentOffset of scrollview, to achieve parallax effect, we need to make image just like scrolling but with speed lower than scrollview. We will use contentsRect property of CALayer inside that image view, which Apple has described it like:
The rectangle, in the unit coordinate space, that defines the portion of the layer’s contents that should be used.
First, we want to scale down contentOffset y property by a factor:
let yOffset = self.scrollView.contentOffset.y * 0.2
We ensure that image view will have offset with max available value, for example: 60. It means image view will move for at most 60 pixels before it stop:
let availableOffset = min(yOffset, 60)
Because contentsRect use top – left – width – height as percentage, we should divider the available offset to image’s height:
let contentRectYOffset = availableOffset / contentImageView.frame.size.height
Finally, we set the contentsRect:
contentImageView.layer.contentsRect = CGRectMake(0.0, contentRectYOffset, 1, 1);
Now run project again, you can see that our image scrolls alongside with scrollview but with different speed.
Play with Speed
Voila! You has just finished your parallax view. Now play with the offset and factor value inside scrollViewDidScroll to make your own adjustment. This effect can be easily implemented in any scrollable container, which will adapt the similar scroll event handling like above. Parallax effect for iOS is somehow an interesting way for developers to gain attraction from users.
You can get source code for project at part-2 tag in GitHub.
In next post, we will implement another form of parallax effect, similar to iOS7 background view and use a video for experiment instead.