
Beauty Me Case Study: RESTful Web Service

In previous post, we had defined how data is organized and flow. We understand that, data will be queried from MySQL server, then exposed through web-service for CMS and mobile app to use. Today we are going to define web-service tier, make sure every APIs are available for both end-users and administrator-users to use.
With web-service, you may hear about SOAP, and REST. In this project, we will use REST architecture, and implement using NodeJS. Our tier can directly access to MySQL server for data manipulation, and only expose needed APIs for client. Following is how web-service tier was organized:
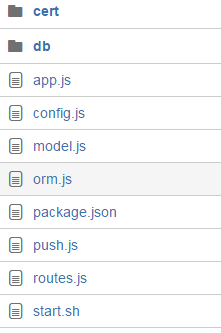
Explaination:
- cert: directory contains needed certification, because we should have Android and iOS work with push notification, we have to store certificates for GCM and APN. Here they are.
- db: this directory is not related to logic part, however, we create this directory to store MySQL database schema, which created by exporting from MySQL Workbench.
- app.js: main entry for web-service tier, this is where our NodeJS app starts.
- config.js: contains configurations and constants for other modules to use.
- model.js: as mentioned in previous post, this is where we define all Sequelize ORMs.
- orm.js: we only manipulate database directly from here by actions including SELECT, or INSERT, UPDATE and DELETE. This module will involve Sequelize to perform actions,
- package.json: of course, NodeJS module and dependencies declaration.
- push.js: a specified module to use with push-notification for GCM and APN.
- routes.js: all web-service controllers are in here, each API will have its own controller, which process login, query database if needed, and construct response for client.
- start.sh: a script which involves ForeverJS to make our web-service tier run without worrying about crashes.
In scope of this post, we will pay attention only to app.js. All APIs will be listed here. Note that we will try to conform with RESTful, however we may create only a REST style.
API Constraints
First, we want all available contents to be retrieved by using GET.
Second, we want all deletable contents can be deleted by using DELETE.
Third, we want all resources which should be updated can be updated or inserted by using POST.
A special case should be image upload (for places, for user,…), this should be performed by using POST with multipart upload.
We also want to completely change our APIs through versioning. So we use prefix for all APIs like /api/v1. Note that we use /api path because the root path / should be used for CMS or app home page.
Users can use the app without logging in, so there will be public APIs, and protected APIs. While public APIs do not check for authentication, protected APIs will require needed authentication field, like Basic Authentication or Digest Authentication.
User can be normal user or administrator, so we should have special APIs for admin-access only. Of course CMS can use many common APIs with user, but all admin-related APIs will be prefixed as /api/v1/admin. Those APIs will need token from administrator account.
Authentication API should be a special case, which require username/password or some credentials and return access token for client.
API Design: RESTful Web Services
Okay, now we have all needed constraints. We will try to define some routes in NodeJS using Express. Note that app is a Express instance, and routes is our above route.
Login
app.post('/api/v1/admin', routes.adminAuthentication);
app.post('/api/v1/auth', routes.authentication);
So, here we have two distinct paths for authentication. CMS (which only administrators can use) will use different paths with normal user because we don’t want our mobile app can directly access to admin area. By restricting by URL, mobile app will never receive admin token, which can lead to insecure design.
Places
app.get('/api/v1/place', routes.getPlaces)
app.get('/api/v1/place/:id', routes.getPlaceById);
app.post('/api/v1/place', routes.authenticationHandler, routes.createPlace);
app.post('/api/v1/place/:id', routes.authenticationHandler, routes.placeAuthenticationHandler, routes.updatePlace);
app.delete('/api/v1/place/:id', routes.authenticationHandler, routes.placeAuthenticationHandler, routes.deleteSalonById);
app.post('/api/v1/place/:id/image', routes.authenticationHandler, routes.placeAuthenticationHandler, routes.multipartHandler, routes.uploadImageForPlace);
Explaination as follow:
- GET /api/v1/place: for getting all available places
- GET /api/v1/place/:id: for getting details about place which have specific id
- POST /api/v1/place: for creating a place, note that this will require user authentication, so we create a separate, reusable Express middleware called authenticationHandler which use request authentication header to get corresponding user. This middleware will reject request if user is invalid.
- POST /api/v1/place/:id: for updating a specific place with id, note that this will not only require user authentication, but also require check if that user has permission to change the place.
- DELETE /api/v1/place/:id: for deleting a specific place with id, similar with above case, we will need authenticationHandler as well as placeAuthenticationHandler to ensure that user is valid and has right access to change the place.
- Finally, POST /api/v1/place/:id/image will allow user to upload image for specific place with id. We will need 3 middlewares: authenticationHandler for user checking, *placeAuthenticationHandler *for permission, and multipartHandler to process multipart data which we just upload. Then if request can pass through all 3 middlewares, we will have multipart data has already written to disk, and use the route uploadImageForPlace to store data path to database and return placeImage object to client.
And so on, all other APIs can be written in similar manner: get/create/update/delete review, voucher, product, etc. After defined all APIs, we can start to implement those logic later. But mobile apps and CMS front-end can take a look at endpoint right now for preparing services. In next post, we will take a look at AngularJS-based front end to know its structure as well as the right way to implement a AngularJS-based app.