
Integrate Firebase Cloud Messaging with NodeJS

Next post in our Firebase series, today I want to help you with the integration Firebase Cloud Messaging (FCM) with your backend server. A typical usecase, is you want to have your users register push notification with Firebase, and from backend, you can trigger push on specific event (like new post was added in a CMS), or from a button in your management control panel.
Prerequisites
In order to have your backend setup, first, you should ensure that you already have:
- Created a Firebase project in Firebase Console.
- Added at least one app (mobile or web) to your project.
- If you added an iOS app, do not forget to Create Certificate for iOS Push Notification.
- In case of mobile app, you may want to look at our previous tutorials Implementing Firebase Cloud Messaging (FCM) into your iOS App or Implementing Firebase Cloud Messaging (FCM) into your Android App.
Setup NodeJS
For simplicity, here we want to use NodeJS as our sample backend. We use the following dependencies with our NodeJS project:
- Express: Famous Node.js web application framework
- Sequelize: A popular ORM framework for NodeJS
- Request: Useful NodeJS library to make HTTP request
Note that how to setup nodejs server is not included in scope of this post. We only focus on two things only:
- Create an API so our mobile apps (or web apps) can register Firebase token with our backend.
- Create an API for sending push notification to selected devices using previously registered token.
Register Firebase Token
Here we assume that our client apps already have Firebase token, we want to post the token to our server so we can save the token to database for later use. The API shall be:
POST /api/v1/push token=<your-firebase-token>
Thus our Express router looks like this:
// routes.js
var pushCtrl = require('./controllers/push');
module.exports = function(app) {
  ...
  app.use('/api/v1/push', pushRoutes());
  ...
};

function pushRoutes() {
  var router = express.Router();
  router.post('/', pushCtrl.registerForPushNotification)
  return router;
};

// app.js
var app = express();
require('./routes')(app);
app.listen(config.APP_PORT);
Explaination:
- app.js is our entry point which register Express routes
- routes.js is where we define all our routes
- push.js is our controller which responsible for handling all push-related operations
Of course you can have your environment differs with me a little bit. However it is not a problem. Now back to our push-controller, we do some simple Sequelize insertion to add our token to database:
DeviceToken.create({ user_id: userId, token: token }).then(cb);
DeviceToken is our Sequelize model.
Send Push Notification To Firebase
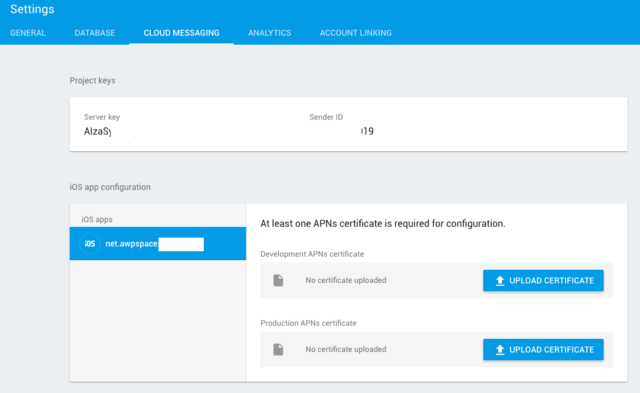
In order to send push notification to Firebase server, we need:
Server Keyvalue, which we can obtained from Firebase Console > Project Settings > Cloud Messaging- Device Token which we have got already
We create another API for sending notification, similar to above:
POST /api/v1/push/send message=<your-own-message>
In our controller, the Express handler shall: get message parameter value from request:
var message = req.body.message;
Query database to get all available device tokens, then send HTTP request to Firebase:
DeviceToken.findAll().then(function(tokens) {
  var options = {
    uri: 'https://fcm.googleapis.com/fcm/send',
    method: 'POST',
    headers: { 'Authorization': 'key=' + <your-fcm-server-key> },
    json: {
      // note that Sequelize returns token object array, we map it with token value only
      'registration_ids': tokens.map(token => token.token ),
      // iOS requires priority to be set as 'high' for message to be received in background
      'priority': 'high',
      'data': { 'title': message, 'body': message }
    }
  };
  request(options, function(error, response, body) {
    if (!error && response.statusCode == 200) {
      // request was success, should early return response to client
      res.sendStatus(200);
    } else {
      res.sendStatus(500);
    }
    // extract invalid registration for removal
    if (body.failure > 0 && Array.isArray(body.results) && results.length == tokens.length) {
      var tokenToBeRemoved = [];
      var results = body.results;
      for (var i = 0; i < tokens.length; ++i) {
        if (results[i].error == 'InvalidRegistration') {
          tokenToBeRemoved.push(tokens[i].token);
        }
      }
      if (tokenToBeRemoved.length > 0) {
        DeviceToken.destroy({
          where: { token: { $in: tokenToBeRemoved } }
        }).then(cb);
      }
    }
  });
});
In the above code, we do:
- Retrieve all available device tokens from database.
- Construct a request to send to FCM, note the Content-Type and Authorization header fields.
- Send the request and check returned status.
- If request was success (or error), perform an early return to our client.
- If there are some failures with our request, we need to find out why. We loop through all results and check if the error was InvalidRegistration, then the corresponding token is no longer valid. Add it to an array and then we can ask Sequelize to remove all invalid tokens.
It’s OK for now, now you can test your API using cURL or PostMan or any tool which you familiar with. Do not forget to send device token from your mobile (or web) apps before test the API.